Your Cart is Empty
Customer Testimonials
-
"Great customer service. The folks at Novedge were super helpful in navigating a somewhat complicated order including software upgrades and serial numbers in various stages of inactivity. They were friendly and helpful throughout the process.."
Ruben Ruckmark
"Quick & very helpful. We have been using Novedge for years and are very happy with their quick service when we need to make a purchase and excellent support resolving any issues."
Will Woodson
"Scott is the best. He reminds me about subscriptions dates, guides me in the correct direction for updates. He always responds promptly to me. He is literally the reason I continue to work with Novedge and will do so in the future."
Edward Mchugh
"Calvin Lok is “the man”. After my purchase of Sketchup 2021, he called me and provided step-by-step instructions to ease me through difficulties I was having with the setup of my new software."
Mike Borzage
Novedge Webinar #69: Q&A with Chris Stringer – Working with Shaders in Artlantis 4.1
April 29, 2013 15 min read
Our 69th Webinar, Working with Shaders in Artlantis 4.1, left us all wanting for more! Here Chris Stringer answers all the questions he couldn't get to during our live Q&A session.
Q 01: Can a render from Artlantis be used as a Postcard?
A: No. A Postcard is a specialized type of low-resolution (400×300 pixel) JPEG rendering with additional information about the scene's materials embedded into it, created in Artlantis using the menu/command Tools/Create Postcard. By contrast, a regular Artlantis rendering created using the menu/command Inspector/Render does not contain this type of information…See also Q 2, Q 12 and Q 24.
Q 02: Can Postcards be moved from one PC to another? Must the Shaders be shared on both rigs?
A: Yes, Postcards can be moved, shared, emailed, etc. Yes, the original Shaders that existed on the computer/project where that Postcard was created must also exist on any other computer where that Postcard is going to be used, if it is to work properly. To ensure that Shaders and other media files used in a specific project travel safely with the project when it is being sent from one computer to another, always remember to save the project using menu/command File/Export as Archive… See also Q 1, Q 12, and Q 24.
Q 03: When you re-assign materials, will it be saved that way when thedocument is reopened?
A: Yes. Those settings are retained in that Artlantis file. See also Q 9.
Q 04: What are the limitations in Artlantis if a texture is pulled fromthe web? Do you lose any feature rich operations if you apply your own texture?
A: The limitations really depend on the quality of the texture and the set of accompanying image maps, because your goal in Artlantis shouldn’t be just to use good textures…it should be to use good Shaders. So,what’s the difference? A texture is a single bitmap image that defines one aspect of a material’s appearance. They can get assigned to the material in the 3D modeler or later in Artlantis. The most common type of texture used isa color (diffuse) image map, which are typically made by photographing a real-world material and often digitally altering them to create seamless edges. A material that only has a single texture map assigned to it is going to appear “flat” and less realistic…i.e. more computer-generated. A Shader is a combination of one or more separate texture files(typically all based on the same color image map as a starting point) that work in combination to define a material’s appearance in ways that cannot be accomplished with the use of a single color image map alone. Shaders typically make use of additional supporting image maps to add effects such as bump, reflection, shininess, normals, etc. These maps interact with the scene’s light and reflections to add life-like qualities to the materials. In Artlantis, it is possible to create a custom Shader that has all of the advanced settings of the high quality default Shaders in Artlantis, since they are offered to you within the menu/command Tools/Create Shader From… But, you either need the skill to create the supporting image maps for the shader (if they don’t already exist), or you need to find someone who already has those skills and has created those image maps. You can learn a lot by using the Create Shader From command to examine some of the existing Shaders’ settings and their accompanying image maps.

Q 05: Is there a specific relationship between values of the bump to the normal maps?
A: The bump and normal maps are both typically derived from the same starting point: the diffuse (color) image map. Both can be used to create the illusion of enhanced depth or relief in a Shader by affecting the way light interacts with the underlying color map, however, the normal map can be used to accomplish more than what is possible to achieve with the bump map. The grayscale information in the bump map can only scatter light in the direction of one axis: the Z axis.The normal map is a more advanced type of bump map, using the RGB color information it contains to scatter light in the X, Y, and Z axes. As an example, when creating a slate floor tile Shader, you might start with an 8 x 8 tile grid for the color map.
Giving it a Reflection of .7 and Shininess of 700 would create the following appearance:

You might use a bump map to simulate the depth of the grout lines and provide a rough textured quality to the slate surface. The lighter areas in the bump map will result in that area of the diffuse map appearing raised while the darker areas will appear to be recessed.

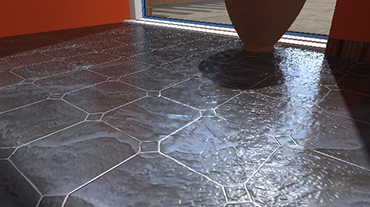
The normal map could have some of those same qualities as the bump map. It could have the same basic texture, accentuating the rough texture of the slate surface (below top). However, it could instead be created to scatter light in a simpler, profoundly different way…to make the individual tiles appear as if none of them were laid completely level (below bottom), so that the reflections of the background do not line up perfectly on each tile.
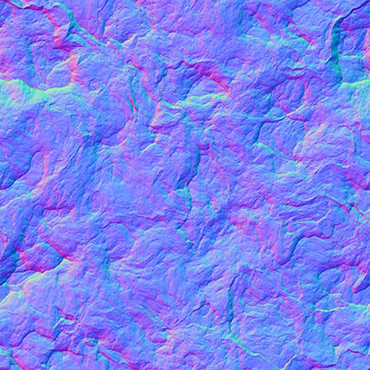


The combination of the bump and the normal maps could be used to both enhance the natural texture of the material and create more of a random appearance to the reflections in the tiles.

Q 06: Chris, can you show us how to use light on interior at night views? Thank you.
A: Lighting will be the subject of a future webinar. In the meantime, you can watch these videos available on the Artlantis YouTube channel: Adding Lights and Physical Camera and Automatic Light Adjustment.
Q 07: How can we make realistic renders like those in 3D Studio Maxusing Sketchup with Artlantis?
A: The built-in Artlantis radiosity engine strikes an excellent balance between quality and speed. However, if you need something that goes beyond the capabilities of the Artlantis radiosity engine, check out the Maxwell Render engine for Artlantis. By default, it is installed with Artlantis 4.1 in a 30-day demo mode (can be activated with the purchase of a separate serial number) and is accessible from the menu/command Artlantis/License/Maxwell Render Engine (on Mac) or Help/Edit License/Maxwell Render Engine (on Windows). Licensed from Next Limit Technologies, the developers of the standalone version of Maxwell Render, the engine is an optional product that excels at creating hyper realistic renderings with physically accurate lighting behavior. The renderings take significantly longer to produce, but if that level of quality is needed, it is possible to do so without having to leave the familiar and extremely easy-to-use Artlantis work environment. That’s a powerful combination! Normally,you’ll want to use Artlantis for your preliminary renderings (and most of your final renderings, for that matter), then use the Maxwell Render Engine when is has to be perfect. You’ll note that there is a dedicated family of Maxwell Render Shaders in the Catalog of mostly reflective and refractive surfaces. You’ll want to apply those in a different version of your Artlantis project before doing a Maxwell rendering.
Artlantis Radiosity Engine:

Maxwell Render Engine:

Q 08: I had difficulties customizing interior views using white walls in Artlantis. I use the "china", "basic" shader, but never got the realistic view as you can see in this if it's possible.
A: If you want to achieve brighter whites, here’s what to do. In our example here, we’ll be changing the walls. First, you’ll want to have probably either the Basic or Expert Shader applied to your surface. The color doesn’t matter, but just to keep things simple, make it white. Locate the blanc.jpg in the Catalog/Images and drag it onto the surface (the walls, for example) in the 3D Preview window. In the ShadersInspector/Material list, select the blank.jpg texture. In the settings for that texture, mark the Rep. checkboxes so that it tiles horizontally and vertically. At this point, you probably won’t notice any visible changes in the 3D Preview window yet.

With the blank.jpg texture still selected in the Shaders Inspector/Material list, adjust the Ambient slider to the right to maybe around 0.20 or so. You should see the white areas of the walls brighten considerably. If you take the Ambient slider all the way up 1.00, it will increase the white to a very unnatural looking pure white, which you wouldn’t normally do. Note that the ceiling in the next image next has not been changed, thus becoming a point of reference compared to the brightened walls.

Q 09: Is it possible to apply a shader texture in just one face of theimported model? Or do we need to import another model with that face in a different shader?
A: Yes, you can apply a Shader to just one face using the re-assign material command. There is no need to import another model. First, select the face by activating the selection tool in above the material list.

Change the selection method to single face.

Click on the desired face in the 3D Preview window to select it. The selected element will temporarily be highlighted. Then, click on the Apply Material icon, in the Shaders Inspector palette.

A dialogue will appear. In this case, you will want to apply a copy of the currently selected material to the surface. Give the new material an appropriate name.

The final result is a new material definition for that surface, which now operates completely independent of the other elements in the scene that shared its previous material. You can then apply Shaders to this surface as you normally would in Artlantis…just drag and drop a Shader directly onto the surface in the 3D Preview Window.
 See also Q 03.
Q 10: How can we use HDRI files to get shaders affected within the environment?
A: While it is true that HDRI does affect the appearance of Shaders in the scene, that’s a lighting/background topic really best left for a future webinar. In the meantime, you can watch this video available on the Artlantis YouTube channel: Artlantis 4.1 – Adding HDRI Background.
Q 11: When we render the "white" shader from native Artlantis there'salways a little bit of gray aspect. How can we control this shader to put it more with and apply to interior walls?
A: See Q 8.
Q 12: Since the Postcards are just jpegs, do they have to be generatedfrom Artlantis?
A: Yes, they must be generated from Artlantis, because they are not “just” jpegs, they are specialized jpegs with additional information embedded into them. See also Q 1, Q 2 and Q 24.
Q 13: Can you do paint on the surface, like graffiti effect?
A: Yes. While there is no paint brush tool in Artlantis, this can be easily achieved if you add an alpha channel to an image in Photoshop to mask out its background. In the alpha channel, dark areas will mask the image and light areas will remain visible. Export as a TIF or PNG, then drag and drop that image file directly into the Artlantis 3D Preview window. Scale, reposition, and check the Use Alpha Channel checkbox.

Q 14: I have problems with 3D plants from version 1.2 looking veryrough when rendered in 4.0. Do you know why that would be?
A: That would be a question for the Artlantis technical support team. We would need to know what plant files you’re using, a few things about your system and setup, and might possibly need an archived project file to diagnose the cause and offer a solution. To submit a support ticket on artlantis.com, use this link.
Q 15: Is there an easy way to use alpha channels in Artlantis, so you can make realistic looking grass for example?
A:Yes, but Shaders might not be the best option. The problem with many grass textures (and even high quality grass Shaders) is that from a far distance, they appear too repetitive, while from a close distance, they appear too flat. You could start with a grass Shader, and drop one or more subsequent grass textures onto it (with various bits masked out using an alpha channel to show the other underlying grass texture) to create a more randomized appearance to the grass texture, but this does nothing to resolve the problem that in real life, unless you’re on a golf course, grass normally doesn’t look like low-pile carpet.
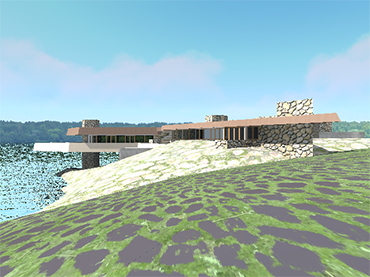
Grass 1 with alpha (goes on top)
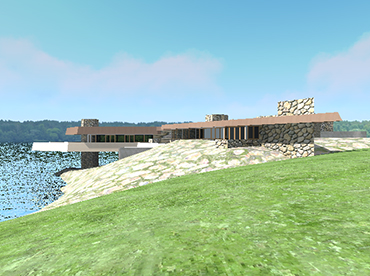
Grass 2 (goes underneath)

Grass textures 1 and 2 combined. The blend creates more randomnessthan using one texture alone, however it still looks pretty flat.
Grass is a material that is really difficult to simulate through just a texture and some bump and normal maps, because in reality it is a highly volumetric type of surface. Yes, you’ve got to put some kind of ground material in your project, but rather than taking great pains to create a Shader to simulate grass or using a high-poly 3D grass object, you could instead make a composite for your final image. Artlantis provides the option to save out a rendering as a Photoshop file. The resulting file contains 5 separate, very useful layers: MODEL_FRONT (the foreground elements), BACKGROUND (the background elements), MATERIAL (a materials map, differentiating the materials in the scene by unique colors), OBJECT (like the materials map, only for objects),and ZBUFFER (a grayscale depth map of the scene). The first 2 layers combine to create the finished rendering, but it’s the last 3 layers that can be very useful for post-process editing.

If you don’t already own Photoshop, stop what you’re doing and order it now. If there’s one other tool you need to create great renderings, it’s Photoshop. We can open this rendering in Photoshop and quickly use the magic wand to select the ground plane in either the OBJECT or MATERIAL layers. We create a grayscale mask from this, then apply a glass distortion filter to it to give it more of a rough edge.

Next step is to combine the rendering with a real image of the site or a photograph of a neatly manicured lawn (via a quick trip to a stockphoto website). I located 2 suitable images, used the content-aware fill to extend and touch up some areas, blended them by setting one of them at 50% opacity, then brightened the result with an overlay layer. Grass is brightened by adding a new solid green layer, set to overlay at 28% opacity

The final result of the new grass added into the overall composition is pictured below. Much more convincing! Since this is a tutorial about adding grass textures, I won’t discuss the additional compositional elements, cropping, and other adjustments that could be done to this image in Photoshop to make it a fully realized architectural rendering.

Q 16: What is a good practice to make good use of those different mapsto make better looking gaps or displacement?
A: See Q 5.
Q 17: We've had a lot of problems with swimming pools in particular. Ifin the modeler the solid element (slab) for the water actually touches the walls around it then Artlantis shows a black surface when rendered. We've been doing a work around which is leaving the water short of the walls and floors of the pool by about 1 cm inorder to not have the black surface. Any suggestions?
A: Sometimes, a simple work around is the best solution! You might also try just using a flat plane for the water. I once talked to a person who was rendering an interior and was puzzled by the way that the exterior looked wrong through the windows, even though everything was oriented properly and set up correctly. As it turned out, she was using the “glass” refraction option in her windows’ glass Shader settings, which was warping the view of the exterior like a magnifying glass. This was quickly and easily resolved by simply changing the glass refraction option to “air.” Your issue might be related to something like this…some weird refraction happening at the water’s edge. If you think this is a bug, you should create a support ticket with the Artlantis technical support team. They would probably need an archived project file to diagnose the cause and offer a solution. To submit a support ticket on artlantis.com, use this link. Another option might be to try posting in the Artlantis forum.
Q 18: Good afternoon, in my experience with Artlantis I have a problem with exterior renders. In general, is there a simple way to make the default shader to look more natural, I mean imperfect, weary orgrayed out?
A: See Q 13 and Q 15 (first half)…stacking alpha channel images on to materials. The repetitiveness of the brick wall in the example from Q13 is definitely broken up by the graffiti, but in your case, you will probably be using a more subtle pattern (maybe a light layer of patchy dirt/grime that is applied across the surface), with maybe a few additional one-off textures applied here or there to resemble pockmarks or imperfections. You can apply as many textures as you want over top of a material, and you can opt to have them simply operate as one instance, or repeat to tile across the surface. Also, keep in mind that when a texture is applied to a material, that texture can then be set to be 100% transparent and used as some other kind of map (such as a Bump map) by adjusting the relevant slider (such as the Bump slider). So, you can really stack up or layer a whole series of graphic effects onto a material to achieve just about anything you want for imperfections or weathering.
Q 19: Can you render the pool image we're looking at?
A: Here’s another look. Sorry, the high resolution version stays with me!


Q 20: Are Artlantis 4 and Artlantis Studio separate applications that need to be purchased separately?
A: That depends on what you need. Artlantis 4 is available in two separate packages: Render and Studio. Render creates still images only, while Studio creates still images plus dynamic content like animations, VR object movies, and iVisit 3D panoramic VR presentations. You can start with Render, and if you ever need to create any of the dynamic presentation content, you can upgrade to Studio for very close to the difference in cost between the two applications. Incidentally, they both use the same file format interchangeably, so an office team could easily use both Render and Studio on the same project files.
Q 21: Can ImageCels be incorporated in Artlantis?
A: Yes. According to the imagecels.com FAQ, their “images (people,trees, etc.) are 2D in the 32 bit .TIF (LZW compressed) file format with embedded alpha channel masks. They are placed against a 0,0,0 black background. Textures are 24 bit .TIF (LZW compressed),seamless and tileable.” TIF is one of the many file formats that Artlantis supports, including support for embedded alpha channels.
Q 22: What are good websites to get HQ textures?
A: There really are a ton of them. Our store, objectsonline.com, sells 6different volumes of Artlantis Shaders, but we do not carry any stand alone texture files. Marlin Studios is one old favorite. Another is TurboSquid. But, even with a site as huge as TurboSquid, I will often start my search by using Google image search, and then happen upon professional texture websites along the way, once I find the best example of a texture for whatever specific material I’m trying to create.
Q 23: I was an Artlantis user for many years and missed the latestupgrade path. In 4.1 can we re use all the shaders that we have for the past versions? (vol 1-10)
A: Artlantis has been around since the days of big hair and spandex (although being a French product, I’m not sure what was popular in Paris back then). When Artlantis was completely recoded and released in 2005, Abvent reset the version numbering to 1.0 and split the product into Render and Studio. Users of the legacy version, which had reached v.4.5, had a period of several years during which they could upgrade at a discount. Currently, users on Render or Studio v1.0 or later are eligible for a discounted upgrade to Render or Studio v4.1. Regarding the legacy Shaders, if the disc they came on is copyrighted year 2000 or later, there is still a chance they might work. Backwards compatibility was available for the legacy Artlantis Shaders volumes1-10, if they were released on or after year 2000. Although many of them still might work, they are not officially supported anymore. I’m not sure if yours will still work for you, but you could test that out by downloading the Artlantis 4.1 demo version, which runs without a serial number for 30 days. You would just need to copy your legacy Shaders into your programs folder…Artlantis/Media/Shaders/.
Q 24: Are postcards embedded in the project file, or do we need totransfer postcards to other computers where the project file is being worked on?
A: Postcards are separate JPEG files that are created in a project, but are saved outside of and operate independently of that project. Do not rename or edit them! They should normally be stored in your program's folder…Artlantis/Media/Postcards/. You will want to keep copies of the Postcards on any computer where you may later want to access them.You should also ensure that any Shaders referenced in a postcard also travel with the Postcard. See also Q 1, Q 2, and Q 12.
Q 25: What is the difference between reflection and fresnel settings?
A: The Reflection setting of a Shader controls one aspect of the Shader’s appearance: its ability to reflect light. The Fresnel Transition can, in effect, dynamically override or exaggerate the Transparency and Reflection settings of the Shader. In order for Fresnel to have any noticeable impact, there must be at least some level of transparency and/or reflectivity assigned to the material in the Shader settings. Fresnel will increase a material’s apparent reflection/opacity as a surface is oriented more obliquely, angled to face away from the observer. Conversely, a material’s apparent reflection/opacity is reduced as a surface is oriented more tangentially, angled to face toward the observer. When a material is assigned a low Fresnel Transition value, the apparent differences between the material’s reflection/opacity, when viewed at different angles, are exaggerated. When a high Fresnel Transition value is used, the differences are minimized. The following images illustrate these differences.
High Fresnel setting viewed at different angles…minimal differences
Fresnel Transition: 8.50 Transparency: 100% Reflection: 100%


High Fresnel setting viewed at different angles…minimal differences.
Fresnel Transition: 8.50 Transparency: 0% Reflection: 100%
High Fresnel setting viewed at different angles…minimal differences
Fresnel Transition: 8.50 Transparency: 100% Reflection: 0%


Low Fresnel setting viewed at different angles…major differences.
Fresnel Transition: 0.50 Transparency: 100% Reflection: 100%


Low Fresnel setting viewed at different angles…major differences.
Fresnel Transition: 0.50 Transparency: 0% Reflection: 100%
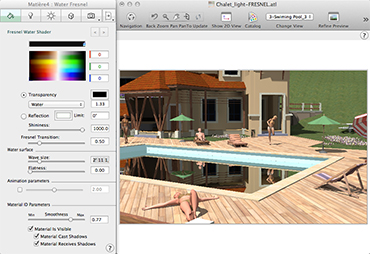
Low Fresnel setting viewed at different angles…major differences.
Fresnel Transition: 0.50 Transparency: 100% Reflection: 0%


Looking to purchase your own copy of Artlantis? Check it out at Novedge.
And don't forget to connect with both Novedge and Artlantis on Twitter, to stay in touch!
Also in NOVEDGE Blog
Enhance Your Designs with VisualARQ 3: Effortless Geometry Extensions for Walls and Columns
April 30, 2025 8 min read
Read More
MecSoft Unveils RhinoCAM 2025 and VisualCAD/CAM 2025 with Enhanced Features
March 08, 2025 5 min read
Read MoreSubscribe
Sign up to get the latest on sales, new releases and more …


